
• Skip to primary navigation
  • Skip to main content
Mamas Secret Recipes
  • About Me
    • Food Info
  • Blog
  • Recipes
  • Videos
  • Contact Me
  • Navigation Menu: Social Icons

    • Facebook
    • Instagram
    • Pinterest
    • Twitter
    • YouTube
menu icon
go to homepage
subscribe
search icon
Homepage link
  • About Me
  • Blog
  • Recipes
  • Videos
  • Food Info
  • Contact Me
    • Bloglovin
    • Facebook
    • Instagram
    • Pinterest
    • Twitter
    • YouTube
  • ×

    Tapioca Coconut Laddus

    April 13, 2012 by Fouzia Husainy 9 Comments

    Tapioca Laddus (Pindaloo ke Laddu) were my grandma’s favourite when I was a child. She loved eating these as a snack in the late afternoon. I still remember how she would pop a whole laddu in her mouth and chew it with her gums as she had not a single tooth left to help her in her endeavour. She would still enjoy all the juicy bites and every bit of it. It was more fun watching her eat than eating it myself.

    Ingredients:
    5 cups grated Tapioca (2 medium size)
    2 cups Coconut (finely grated)
    1/2 can Nestle/Clic cream (175gm)
    Sugar – 1 cup

    Method:
    1. Wash and clean the tapioca in running water. Boil them in a big pot of water. When they are done their thick skin would start cracking. Remove, drain and let them cool down first, then grate them coarsely.
    2. Add 1 1/2 cups of the grated coconut, sugar and cream to the grated tapioca.
    3. Mix everything well. Make them into round balls (laddus) then roll them in the grated coconut and set aside. Place them all one by one in coloured baking cups and chill them in the fridge. Enjoy when chilled.

    Recipe

    Tapioca Coconut Laddus

    Author: Fouzia Husainy
    Course Snack, Street food
    Cuisine south indian

    Ingredients
      

    • 5 cups grated Tapioca 2 medium size
    • 2 cups Coconut finely grated
    • 1/2 can Nestle/Clic cream 175gm
    • Sugar – 1 cup
    Get Instant Help
    InstacartGet Recipe Ingredients

    Instructions
     

    • Wash and clean the tapioca in running water. Boil them in a big pot of water. When they are done their thick skin would start cracking. Remove, drain and let them cool down first, then grate them coarsely.
    • Add 1 1/2 cups of the grated coconut, sugar and cream to the grated tapioca.
    • Mix everything well. Make them into round balls (laddus) then roll them in the grated coconut and set aside. Place them all one by one in coloured baking cups and chill them in the fridge. Enjoy when chilled.
    Print Recipe Pin Recipe Share on Twitter Share on Facebook

    Filed Under: Coconut, Desserts, Food, Gluten Free, Indian Cuisine, Ramadan meals, South Indian Cooking, tapioca, Vegan

    Sweet Potato Focaccia – Peasant Style!

    April 10, 2012 by Fouzia Husainy 6 Comments

    sweet potato focaccia
    Focaccia has been a favourite bread in our family and I have been making it ever since my kids were small. The crunchy crust and the spongy texture of the bread with lots and lots of olive oil drizzled on it is just so enjoyable, no matter what toppings you add according to your mood. I love the aroma that emanates in the air when it is being baked and the smell and flavour of pure olive oil. For a great tasting focaccia, it is important to use the best quality, 100% pure extra virgin olive oil.

    Lot of olive oils available in the market are adulterated, so it is best to ascertain their quality before making the purchase. I always use Kirkland’s extra virgin olive oil available at Costco. This is not because I trust the quality of Costco’s products but because “Costco recently took better measures to ensure that only 100 percent authentic Italian extra virgin oil is sold at the warehouse. Costco is fully aware of this illegal situation and has worked diligently to ensure its Kirkland Signature EVOO is authentic and traceable.” You can read the full article here

    I had some leftover roasted sweet potato and I wanted to make good use of it. The thought of making chaat or eating it with sprinkled cinnamon, brown sugar/honey was not appealing. The other day I made flat bread (rotis) out of it and enjoyed eating them all.  Something different and unique was what I wanted to try out and I could think of nothing but my dear old focaccia and this time with roasted sweet potato and fresh rosemary. I imagined the taste in my mind – the sweet focaccia bread with the rosemary flavour combined with fresh vegetable toppings – will definitely be a success! So I tweaked my recipe for regular focaccia a bit by adding egg and increasing the flour quantity and lo and behold, it worked out very well.

    sundried tomato focaccia
    Ingredients:
    4- 41/2 cups all purpose flour
    1 tbs quick rising yeast
    3/4 cup lukewarm water
    1/2 tsp salt
    1 egg
    1 sweet potato (medium size)
    4 tbs olive oil
    1 each green and red peppers
    6 white button mushrooms
    1/4 cup sliced red onions –
    A few green / black olives – optional
    1 tomato diced
    1 small strand of fresh rosemary herb (can be substituted with basil/oregano)
    Mozzarella / cheddar cheese – optional

    Instructions:
    1. Preheat oven to 400 º F and roast the sweet potato with the skin for 30 – 45 minutes till it is tender. Prick it with a knife before placing it in the oven to prevent it from bursting while roasting.  Peel them when they cool down, mash well and set them aside.
    2. Warm a cup of water in the microwave for 35 seconds. It should be lukewarm to touch. Add 1 tbs yeast and 1/2 tbs sugar, mix well and leave it to rise for 5 mins.
    3. Meanwhile process 3 cups of sifted flour in the food processor with salt till it mixes well. Now add the egg, mashed sweet potatoes and pulse again, then add the yeast solution. At this stage you may find the dough a bit sticky, so add the remaining flour little by little while pulsing until well incorporated and a smooth ball of dough is formed.
    4. Now add 1 tbs olive oil to it and pulse more till the dough starts spinning. This means the dough consistency is reached. The dough starts spinning when it is elastic. We need an elastic kind of dough to get a spongy texture in the focaccia. At this stage remove the dough from the processor, roll it in the shape of a ball, put it in a greased container, cover with plastic wrap and let it rise for up to 1 hr.
    5. When the dough doubles in size, place it on a large 12 inch greased pizza pan, punch it down then start working on it in a clockwise circular motion by pressing out the dough evenly to the circumference of the pizza pan to a complete 12 inch round.

    6. Pat the crust with your hands to make sure it is spread evenly all around. Make indentations on the crust with your fingers like little dimples.
    7. Drizzle olive oil generously on it so that it fills in all the dimples. Let it rest for 10 minutes.


    8. Sprinkle dried rosemary or oregano and basil, then spread all the cut vegetables on top. Press them a bit and leave to rest for another 15 minutes to let it puff up. Then bake in the (second position from the bottom) in the oven for 15-20 mins till it is crisp on the bottom and lightly golden on top. You may add cheese towards the end. Just wait for the cheese to melt and remove. Cut them into wedges or squares and enjoy.

    Recipe

    Sweet Potato Focaccia – Peasant Style!

    Author: Fouzia Husainy
    Cuisine Italian Cuisine

    Ingredients
      

    • 4- 41/2 cups all purpose flour
    • 1 tbs quick rising yeast
    • 3/4 cup lukewarm water
    • 1/2 tsp salt
    • 1 egg
    • 1 sweet potato medium size
    • 4 tbs olive oil
    • 1 each green and red peppers
    • 6 white button mushrooms
    • 1/4 cup sliced red onions –
    • A few green/black olives – optional
    • 1 to mato diced
    • 1 small strand of fresh rosemary herb can be substituted with basil/oregano
    • Mozzarella/cheddar cheese – optional
    Get Instant Help
    InstacartGet Recipe Ingredients

    Instructions
     

    • Pre heat oven to 400 degrees F and roast the sweet potato with the skin for 30 – 45 minutes till they are tender. Poke them with a knife before keeping them in the oven otherwise they burst while roasting. Peel them when they cool down, mash well and set them aside.
    • Warm a cup of water in the microwave for 35-40 seconds. It should be lukewarm to touch. Add 1 tbs yeast and 1/2 tbs sugar, mix well and leave it to rise for 5 mins.
    • Meanwhile process 3 cups of sifted flour in the food processor with salt till it mixes well. Now add the egg, mashed sweet potatoes and pulse again, then add the yeast solution. At this stage you may find the dough a bit sticky, so add the remaining flour little by little while pulsing until well incorporated and a smooth ball of dough is formed.
    • Now add 1 tbs olive oil to it and pulse more till the dough starts spinning. This means the dough consistency is reached. The dough starts spinning when it is elastic. We need an elastic kind of dough to get a spongy texture in the focaccia. At this stage remove the dough from the processor, roll it in the shape of a ball, put it in a greased container, cover with plastic wrap and let it rise for up to 1 hr.
    • When the dough doubles in size, place it on a large 12 inch greased pizza pan, punch it down then start working on it in a clockwise circular motion by pressing out the dough evenly to the circumference of the pizza pan to a complete 12 inch round.
    • Pat the crust with your hands to make sure it is spread evenly all around. Make indentations on the crust with your fingers like little dimples.
    • Drizzle olive oil generously on it so that it fills in all the dimples. Let it rest for 10 minutes.
    • Sprinkle dried rosemary or oregano and basil, then spread all the cut vegetables on top. Press them a bit and leave to rest for another 15 minutes to let it puff up. Then bake in the (second position from the bottom) in the oven for 15-20 mins till it is crisp on the bottom and lightly golden on top. You may add cheese towards the end. Just wait for the cheese to melt and remove. Cut them into wedges or squares and enjoy.
    Print Recipe Pin Recipe Share on Twitter Share on Facebook

    Filed Under: American, Baked Treats, Bread, Brunch, Canadian Cuisine, Focaccia, Italian Cuisine, Lunch, Sun dried Tomatoes, Sweet Potato Tagged With: focaccia, Italian bread, italian food, sundried tomato focaccia, sweet potato focaccia, vegan focaccia, veggie focaccia

    Roasted coconut chicken

    October 30, 2011 by Fouzia Husainy Leave a Comment

    Ingredients:
    Whole chicken cut into 8-12 pieces
    Fresh Coconut pieces – 1/2 cup
    Garlic cloves – 2 big size
    Shah Zeera(black cumin) – 1tspn
    Dried red chillies – 3-4 medium size
    Black Pepper- 1tspn
    salt – 1/2 tspn
    Water – 1-2 tblspns
    Olive oil – 2tblspns
    veg/canola oil – 1tspn
    Lemon juice – 1 tblspn

    Method:
    De-skin, clean and cut the whole chicken into pieces, wash, rub them with a little salt & lemon juice and set them aside. Fry the red chillies, coconut and crushed garlic in 1 tspn veg/canola oil till the coconut pieces are golden and the chillies change color. Drain and remove from the pan. Put everything in the blender or wet grinder along with water, a pinch of salt and shah zeera to make a coarse paste. Add 2 tblspns olive oil to it. Rub the chicken pieces with this marinade. Leave for 1/2 an hr. Then roast the chicken in a pre-heated oven at 400 degrees fahrenheit for 45-50 minutes. Serve hot with rice and salad.


    Food & Drink


    hotell London

    Filed Under: Chicken, Non-Vegetarian

    Cheesy White Chilli Chicken

    September 23, 2011 by Fouzia Husainy Leave a Comment

    There was ricotta cheese sitting in the fridge and I had to make a chicken dish for dinner. I wanted to make something different to avoid the curry smell and the spicy taste which the kids are fed up of eating day in and day out. I imagined what kind of taste the kids would appreciate, so had to incorporate the ingredients to get the flavour I wanted. The smooth texture of the ricotta cheese with the hung yoghurt and the subtle flavour of the cardamom along with the other ingredients made a good marinade. The white chilly powder spiced up the whole dish deceptively. White chilly powder can be a good substitute for white pepper if you want to avoid the strong odour of white pepper which cuts out all the other flavours in the food. The Minar brand of white chilly powder is available in grocery stores and in Ottawa at the Desi price club.

    Ingredients:
    1 Whole chicken – 1.5kgs
    Ricotta cheese – 1/2 cup
    Ginger garlic paste – 2 tspns
    White chilly powder – 1tspn
    Cardamom powder – 1/2 tspn
    Coriander powder – 1tspn
    Hung yoghurt or thick curds – 1/4 cup
    Raw papaya powder (kachri powder) – 1tspn
    Salt – 1/2 tspn
    Olive oil – 1 tbspn + 1 tblspn for basting

    Method: Clean, wash and cut the chicken breast into bite size pieces, towel dry and set them aside. Rub them with salt and kachri powder and leave for 10 mins. Kachri powder is used to tenderise the chicken. It is important to use thick curds or hung yoghurt because we do not want a runny marinade. The chicken pieces should be dry too. Mix together all the marinade ingredients including olive oil and leave to marinate for 1-2 hrs. Put the chicken pieces in a baking tray or cookie sheet covered with tin foil and broil on high for 4-6 mins on each side. Do not cover the chicken while broiling. Baste them with olive oil while broiling. Serve them hot with sliced onions and lemon wedges. Alternatively you may also bake the chicken (if the pieces are of big size and the quantity is large) on 400 degrees fahrenheit for 45 minutes.


    Food & Drink


    hotell London

    Filed Under: Chicken, Non-Vegetarian

    Black rice salad

    September 23, 2011 by Fouzia Husainy Leave a Comment

    black rice salad

    black rice salad


    The deliciously aromatic black rice with a chewy, nutty texture and rich taste makes an incredibly versatile salad with vegetables & a flavourful dressing. You can try different kinds of black rice salads using different vegetables and dressings.

    There is a saying that” Black rice is the kind of food that can save your life”. Yes it is true!  It is one of the special breeds of rice that was specifically reserved for kings in ancient times. Rich in iron, vitamin E and full of antioxidants it has a natural healing power and anti-aging properties. It has more antioxidants than blueberries, less sugar and high fibre. It is a good substitute for prescriptive drugs which are taken to break down arterial plaque and fight high cholesterol levels. Unlike the prescribed medications it has no side effects. It has also become known as the ‘super food’ because of its high nutritional value. Read about the health benefits and some interesting facts on www.blackrice.com .

    Ingredients:
    2 cups black rice
    1 red pepper
    1 green pepper
    2 stalks of spring onions
    10 cherry tomatoes
    1/2 cup chopped curly parsley

    Dressing:
    2 tbs olive oil
    juice of 1 orange
    juice of one lemon
    1 tbs lemon zest
    2 tbs chopped ginger
    1/2 tsp dijon mustard
    1/2 tsp salt
    1/2 tsp black Pepper

    Instructions:

    1. Wash the black rice 3 or 4 times in water and let it soak overnight or for at least 2 hours. But it is best to soak it overnight as it cooks quickly

    2. Boil the soaked rice in a large pot filled with water. Add 2 tbs salt and let the rice cook till it is just done (al dente not overcooked). Drain and set aside till it cools.

    3.  Meanwhile prepare the vegetables. Cut the green and red pepper into small dices, chop finely the green onions and parsley, deseed the cherry tomatoes, cut them into halves. Use paper towels to dab the vegetables dry.

    4. Add the cut vegetables to the cooled black rice. Sprinkle salt and pepper as required. Mix well with a fork.

    5. For the dressing whisk all the ingredients well. Keep aside.

    6. Drizzle the dressing on the rice salad just before serving.  Enjoy.


    Recipe

    Black Rice Salad

    Author: Fouzia Husainy
    Yes, Black rice is the kind of food that can save your life! It is one of the special breeds of rice specifically reserved for kings in ancient times. Rich in iron, vitamin E and full of antioxidants it has a natural healing power and anti-aging properties. It has more antioxidants than blueberries, less sugar and high fibre. It is a good substitute for prescriptive drugs which are taken to break down arterial plaque and fight high cholesterol levels. Unlike the prescribed medications it has no side effects. It has also become known as the 'super food' because of its high nutritional value.
    Course Lunch, Side Dish
    Cuisine Asian, Canadian Cuisine

    Equipment

    • Instant Pot, Pressure cooker, slow cooker

    Ingredients
      

    Ingredients:

    • 2 cups black rice
    • 1 red pepper
    • 1 green pepper
    • 2 stalks of spring onions
    • 10 cherry tomatoes
    • 1/2 cup chopped curly parsley

    For the Dressing:

    • 2 tbs olive oil
    • juice of 1 orange
    • juice of one lemon
    • 1 tbs lemon zest
    • 2 tbs chopped ginger
    • 1/2 tsp dijon mustard
    • 1/2 tsp salt
    • 1/2 tsp black Pepper
    Get Instant Help
    InstacartGet Recipe Ingredients

    Instructions
     

    • Instructions:
    • Wash the black rice 3 or 4 times in water and let it soak overnight or for at least 2 hours. But it is best to soak it overnight as it cooks quickly
    • Boil the soaked rice in a large pot filled with water. Add 2 tbs salt and let the rice cook till it is just done (al dente not overcooked). Drain and set aside till it cools.
    • Meanwhile prepare the vegetables. Cut the green and red pepper into small dices, chop finely the green onions and parsley, deseed the cherry tomatoes, cut them into halves. Use paper towels to dab the vegetables dry.
    • Add the cut vegetables to the cooled black rice. Sprinkle salt and pepper as required. Mix well with a fork.
    • For the dressing whisk all the ingredients well. Keep aside.
    • Drizzle the dressing on the rice salad just before serving.  Enjoy.
    Print Recipe Pin Recipe Share on Twitter Share on Facebook

    Filed Under: Black rice recipes, Eating Healthy, Quick and easy, Rice, Salads Tagged With: black rice, forbidden rice, purple rice, rice japonica, super food, Super grain, Thai black rice

    Thin Beef steaks in coconut sauce

    September 21, 2011 by Fouzia Husainy Leave a Comment

    Ingredients:
    Thin Beef steaks – 8 (1/4 – 1/2 an inch thick)
    Black pepper – 1 – 2tblspns
    Lemon juice – 2 tblspns
    Garlic cloves – 2 medium size finely grated
    Salt to taste
    Cumin powder – 1tspn
    Olive oil – 2 tblspns

    Coconut sauce:
    Coconut powder- 2 tblspns
    Ginger garlic paste – 1/4 tspn
    Cayenne pepper flakes – 1/4 tspn
    Crushed cumin seeds – 1/2 tspn
    Black pepper – 1 tspn
    Water – 1/4 cup
    Olive oil – 1 tspn

    Method:
    Mix together lemon juice,salt, black pepper, cumin powder, grated garlic and olive oil and make a fine paste by mashing the grated garlic with a tspn. Marinate the steaks with this paste after rubbing them with 1/2 tspn salt. Leave aside for 1/2 an hr. Take a non stick pan and set on medium heat. Pan fry the steaks for 3 mins on each side. Do not over cook them. Remove and set aside. Now prepare the sauce on the same pan by adding the crushed cumin, red cayenne pepper flakes, ginger garlic paste to the 1tspn olive oil. Give it a quick stir. Mix the coconut powder with water and add it immediately to the pan. Let it thicken a bit. Turn the heat to low. Now add the steaks to the pan, turn them over in the pan till they are nicely slothered in the sauce. Garnish with fresh parsely and serve with fries & salad of your choice. Enjoy.


    Food & Drink


    hotell London

    Filed Under: Beef

    Traditional Madrasi Chicken Biryani

    August 16, 2011 by Fouzia Husainy Leave a Comment

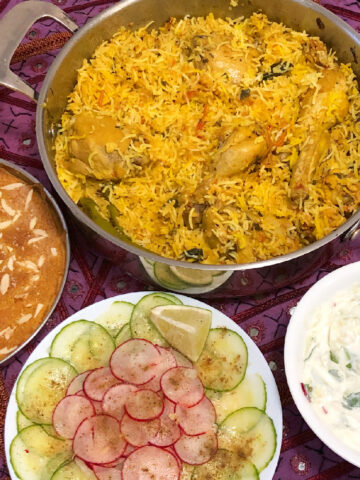
    chicken biryani


    traditional chicken biryani

    The traditional madrasi chicken biryani is very popular in South India especially in Chennai where not a single muslim function or event is complete without this being served. Its aroma fills the air and you can smell the biryani at least 5 houses down the street. It is so insanely delicious!

    The art of the traditional madrasi biryani lies in its technique and the few tips and tricks which add to its flavour and taste. The flavour is enhanced by adding selected whole garam masala spices. Adding too many garam masala spices or garam masala powders mars its flavour and adding cashew or almond paste makes the rice grains sticky.

    What is important in a delicious biryani is a combination of  flavour, texture and taste and this is achieved by adding the right spices, the right quality and the right proportions of all the  ingredients and at the right time using the right technique. It is like a marriage which comes together when everything is in perfect harmony.

    Here’s the recipe:

    Ingredients:
    1 whole chicken + 1/2 a breast (2kgs)
    6 onions medium size
    5 tomatoes medium size (preferably vine or plum)
    10 cloves
    10 green cardamoms
    2 x 3″ cinnamon sticks
    1 cup vegetable oil
    1/2 a cup ginger garlic paste
    10-12 green chillies small size
    a handful of mint leaves
    1 cup cilantro chopped
    a generous pinch of saffron
    1/2 tsp turmeric
    1 tsp red chilli powder
    5 cups long grain basmati rice

    chicken biryani


    Instructions:
    1. Peel, wash and slice the onions. You could use a food processor as it is much easier. Grind the ginger garlic paste. Wash and cut tomatoes into quarters, remove the stems from the green chillies, wash and chop coriander, wash mint leaves and keep aside.

    2. Heat 1 cup of oil in a big pot. Add the whole cinnamon sticks, cloves and cardamoms.

    3. Add the sliced onions and fry them on medium heat stirring on and off taking care not to burn them. The onions first turn translucent and then start getting golden brown.This takes at least 10 – 15 minutes. They should be evenly brown as in the picture.

    4. Stir in the ginger garlic paste, turmeric and red chilli powder.  Stir the spices on medium heat and as soon as you get a whiff of the spicy aroma add the tomatoes and green chillies.

    5. Let the tomatoes soften a bit, then add the yoghurt followed by mint leaves and chopped coriander. Stir gently to mix everything well. Let it simmer for sometime till the oil starts leaving the masala and coming on top.

    6. Now is the time to add the chicken pieces. Lightly turn over the chicken in the masala on medium heat taking good care not to break the pieces.

    7. Cover with a lid and cook the chicken on medium low till it is tender and cooked through. Do keep checking the chicken from time to time and gently turn over the pieces so they don’t stick to the bottom.

    8. Meanwhile wash and soak the basmati rice for 1/2 an hour. Set the pot with at least 6 litres of water to boil.

    9. After 5-10 minutes when the chicken looks opaque and no longer pink, simmer on low heat till the gravy slowly thickens and the oil rises on top. At this stage the chicken yakhni (biryani curry) is ready. Squeeze in the juice of half a lime, taste and adjust the  salt.

    10. Preheat the oven to 400ºF.  Remove the chicken pieces from the yakhni curry on a plate and transfer just the chicken yakhni(curry) to a roaster and place it in the oven without the lid.

    11. Boil the soaked basmati rice till it is  70% cooked. The grains should be soft outside but still brittle inside.

    12. Drain the rice quickly and pour it over the yakhni (the prepared chicken biryani curry) in the roaster.

    13. Crush the saffron using a mortar and pestle then add 2 table spoons of hot water to it. Sprinkle half saffron water over the white rice. Add the food colouring to a few grains of cooked rice and sprinkle the coloured rice on top. Then top it with more chopped coriander and  mint leaves. Now place the chicken pieces over the rice.

    13. Cover the roaster with the lid and bake in the preheated oven for 10 – 15 minutes. After 10 minutes , open the roaster and test the rice for doneness. If you find it gritty then bake it for 5 more minutes. Once it is done,  remove from the oven, add the remaining saffron water, close the lid and let the roaster rest on the counter or the stove top for 5 more minutes.

    14. With the help of a flat rounded spatula gently turn over and mix the biryani from the bottom to the top little by little, taking care not to break the chicken pieces.  And as you mix, keep transferring the biryani and the chicken pieces to the serving platter a little at a time. Do not mix the biryani all at once as this will not only break the chicken pieces but also the rice grains. You have to slowly and gently mix it little by little with lot of patience.

    15. Enjoy the chicken biryani with onion cucumber raita/yogurt chutney and eggplant chutney.

    chicken biryani

    Cooking Tips:
    1. When you soak the basmati rice the water should be at least 4 inches above the rice. If there is less  water the rice would tend to break and become sticky. Regular basmati rice should be washed and soaked for 1/2 an hour and the golden Sela basmati for 2 – 4 hrs. Please note that the golden sela rice takes longer to cook than regular basmati rice.
    2. Boil the rice in a big pot that can cook 5kgs of rice/pasta and which can hold at least 8 litres of water. If you boil 1 kg of rice in a 1 litre pot then the rice would become sticky and mushy.
    3. To test the rice for doneness, take a grain of rice and press it between your index finger and thumb. It should leave 3 small brittle grains on your finger. If the rice is not done yet then you wouldn’t be able to press the rice. Therefore it should be just a little soft on the outside but still gritty inside.
    4. For extra flavour, smash 3-4 more green cardamoms just to open them a little and add them to the yakhni when it is simmering in the roaster just before adding the rice.
    5. Adding saffron water or saffron milk right at the end brings out the extra flavour.
    6. I also add a little ghee on top of the rice before steaming it in the roaster at the final stage for added flavour.
    7. Alternatively instead of pouring the saffron water on the biryani,, you can melt butter in the saffron solution, add some of the boiled basmati rice to it and then sprinkle the butter flavoured saffron rice on top. This also enhances the flavour.
    8. Use preferably ripe vine or plum tomatoes as they are not too tangy.
    9. Choose medium sized freshly slaughtered yellow grain fed chicken.
    10. Yoghurt should be thick, creamy and slightly sour. I prefer balkan style astro yoghurt or the 3.5% plain astro yoghurt.
    11. Use the darker variety of cinnamon (cassia bark) not the lighter Ceylon cinnamon which is mostly used in making sweet dishes.
    12. For food colouring use the natural food colouring such as cochineal. Other dyes (red no.1 and red no.40) carry great health risks as they come from petroleum byproducts.

    Recipe

    chicken biryani

    Traditional Madrasi chicken biryani

    Author: Fouzia Husainy
    Course Dinner, Lunch, Main Course
    Cuisine indian cuisine

    Ingredients
      

    • 1 whole chicken + 1/2 a breast 2kgs
    • 6 onions medium size
    • 5 tomatoes medium size preferably plum
    • 10 cloves
    • 10 green cardamoms
    • 2 x3" cinnamon sticks
    • 1 cup vegetable oil
    • 1/2 a cup ginger garlic paste
    • 10-12 green chillies small size
    • a handful of mint leaves
    • 1 cup cilantro chopped
    • a generous pinch of saffron
    • 1/2 tsp turmeric
    • 1 tsp red chilli powder
    • 5 cups long grain basmati rice
    Get Instant Help
    InstacartGet Recipe Ingredients

    Instructions
     

    • Peel, wash and slice the onions. You could use a food processor as it is much easier. Grind the ginger garlic paste. Wash and cut tomatoes into quarters, remove the stems from the green chillies, wash and chop coriander, wash mint leaves and keep aside.
    • Heat 1 cup of oil in a big pot. Add the whole cinnamon sticks, cloves and cardamoms.
    • Add the sliced onions and fry them on medium heat stirring on and off taking care not to burn them. The onions first turn translucent and then start getting golden brown.This takes at least 10 - 15 minutes. They should be evenly brown as in the picture.
    • Stir in the ginger garlic paste, turmeric and red chilli powder.  Stir the spices on medium heat and as soon as you get a whiff of the spicy aroma add the tomatoes and green chillies.
    • Let the tomatoes soften a bit, then add the yoghurt followed by mint leaves and chopped coriander. Stir gently to mix everything well. Let it simmer for sometime till the oil starts leaving the masala and coming on top.
    • Now is the time to add the chicken pieces. Lightly turn over the chicken in the masala on medium heat taking good care not to break the pieces.
    • Cover with a lid and cook the chicken on medium low till it is tender and cooked through. Do keep checking the chicken from time to time and gently turn over the pieces so they don't stick to the bottom.
    • Meanwhile wash and soak the basmati rice for 1/2 an hour. Set the pot with at least 6 litres of water to boil.
    • After 5-10 minutes when the chicken looks opaque and no longer pink, simmer on low heat till the gravy slowly thickens and the oil rises on top. At this stage the chicken yakhni (biryani curry) is ready. Squeeze in the juice of half a lime, taste and adjust the  salt.
    • Preheat the oven to 400ºF.  Remove the chicken pieces from the yakhni curry on a plate and transfer just the yakhni (curry) to a roaster and place it in the oven without the lid.
    • Boil the soaked basmati rice till it is  70% cooked. The grains should be soft outside but still brittle inside.
    • Drain the rice quickly and pour it over the yakhni (the prepared chicken biryani curry) in the roaster.
    • Crush the saffron using a mortar and pestle then add 2 table spoons of hot water to it. Sprinkle half saffron water over the white rice. Add the food colouring to a few grains of cooked rice and sprinkle the coloured rice on top. Then top it with more chopped coriander and  mint leaves. Now place the chicken pieces over the rice.
    • Cover the roaster with the lid and bake in the preheated oven for 10 - 15 minutes. After 10 minutes , open the roaster and test the rice for doneness. If you find it gritty then bake it for 5 more minutes. Once it is done, remove from the oven, add the remaining saffron water, close the lid and let the roaster rest on the counter or the stove top for 5 more minutes.
    • With the help of a flat rounded spatula gently turn over and mix the biryani from the bottom to the top little by little, taking care not to break the chicken pieces.  And as you mix, keep transferring the biryani and the chicken pieces to the serving platter a little at a time. Do not mix the biryani all at once as this will not only break the chicken pieces but also the rice grains. You have to slowly and gently mix it little by little with lot of patience.
    • Enjoy the chicken biryani with onion raita and eggplant chutney.

    Notes

    Cooking Tips:
    1. When you soak the basmati rice the water should be at least 4 inches above the rice. If there is less  water the rice would tend to break and become sticky. Regular basmati rice should be washed and soaked for 1/2 an hour and the golden Sela basmati for 2 - 4 hrs. Please note that the golden sela rice takes longer to cook than regular basmati rice.
    2. Boil the rice in a big pot that can cook 5kgs of rice/pasta and which can hold at least 8 litres of water. If you boil 1 kg of rice in a 1 litre pot then the rice would become sticky and mushy.
    3. To test the rice for doneness, take a grain of rice and press it between your index finger and thumb. It should leave 3 small brittle grains on your finger. If the rice is not done yet then you wouldn't be able to press the rice. Therefore it should be just a little soft on the outside but still gritty inside.
    4. For extra flavour, smash 3-4 more green cardamoms just to open them a little and add them to the yakhni when it is simmering in the roaster just before adding the rice.
    5. Adding saffron water or saffron milk right at the end brings out the extra flavour.
    6. I also add a little ghee on top of the rice before steaming it in the roaster at the final stage for added flavour.
    7. Alternatively instead of pouring the saffron water on the biryani,, you can melt butter in the saffron solution, add some of the boiled basmati rice to it and then sprinkle the butter flavoured saffron rice on top. This also enhances the flavour.
    8. Use preferably ripe vine or plum tomatoes as they are not too tangy.
    9. Choose medium sized freshly slaughtered yellow grain fed chicken.
    10. Yoghurt should be thick, creamy and slightly sour. I prefer balkan style astro yoghurt or the 3.5% plain astro yoghurt.
    11. Use the darker variety of cinnamon (cassia bark) not the lighter Ceylon cinnamon which is mostly used in making sweet dishes.
    12. For food colouring use the natural food colouring such as cochineal. Other dyes (red no.1 and red no.40) carry great health risks as they come from petroleum by products.
    Print Recipe Pin Recipe Share on Twitter Share on Facebook

    Filed Under: Biryani, Chicken, Non-Vegetarian, Party food, Ramadan meals, Rice Tagged With: biryani, chicken biryani, Madrasi chicken biryani, murg pulao, Murgh biryani

    Beetroot Biryani

    August 12, 2011 by Fouzia Husainy Leave a Comment

    This is vegetarian preparation of biryani using beetroot as the only vegetable. It has all the flavours of a biryani but made with beetroot as the main ingredient. So deliicous!


    Here’s the recipe:

    Ingredients:
    1/2 cup canola oil
    2” stick dark cassia cinnamon bark
    6 Green Cardamoms
    6 cloves
    a pinch of shahi zeera
    3 large onions sliced
    1 heaped tbs ginger garlic paste
    1/2 tsp turmeric
    1/2 tsp red chilli powder
    4 medium sized tomatoes
    1/2 cup yogurt
    6-8 green chillies
    Salt as per taste
    3 cups grated beetroot
    1 cup chopped cilantro
    A few fresh mint leaves
    A pinch of saffron (Irani or Spanish saffron)
    A pinch of orange food colouring

    Instructions:

    1. Peel, wash and grate the beetroot. Peel and slice the onions, remove the stem from the green chillies.

    2. Fry the onions in oil till golden brown on medium heat after adding the whole garam masala spices(cloves, green cardamom and cinnamon, shahi zeera and bay leaf. (Shahi zeera and bay leaf are optional).

    3. When the onions turn golden brown, add the ginger garlic paste followed by turmeric and kashmiri chilli powder (I prefer kashmiri chilli for its deep red colour and good flavour) Stir for a few seconds, then immediately add the diced tomatoes. Once they soften a bit toss in the yogurt, green chillies and salt

    4. Now throw in the grated beetroot. Turn over and mix well in the masala. Add mint leaves and chopped cilantro.  Let it cook for sometime on simmer.

    5. Meanwhile boil the basmati rice in another pot filled with water. Add 1 1/2 heaped tablespoons of salt to the boiling rice. When you taste the water after adding salt it should taste like sea water, so adjust the salt accordingly. Cook the rice till it is half done. The outer layer of the grains should have softened a little and when you press it in between your index finger and thumb it should leave at least 2 or 3 round uncooked grains. It is now time to drain the rice using a strainer or a perforated colander.

    6. Pour the steaming hot rice over the beetroot masala. Take a a tablespoon of the boiled rice, add some food colouring to it, mix well and sprinkle the coloured rice on top. Also throw in a few mint leaves and chopped coriander. Then let it steam in a preheated oven at 350 degrees fahrenheit. Remove from oven after 15 mins. Turn over the biryani rice gently from the bottom to the top with a round spatula to mix well. Serve hot with onion raita.

    7. Enjoy the Beetroot Biryani with roasted chicken, meat, shrimp or any of your favourite side dishes.

    Recipe

    beetroot biryani

    Beetroot Biryani

    Author: Fouzia Husainy
    This is vegetarian preparation of biryani using beetroot as the only vegetable. It has all the flavours of a biryani but made with beetroot as the main ingredient. So deliicous!
    Course Main Dish
    Cuisine South indian Cuisine

    Ingredients
      

    • 1/2 cup canola oil
    • 2 ” stick dark cassia cinnamon bark
    • 6 Green Cardamoms
    • 6 cloves
    • a pinch of shahi zeera
    • 3 large onions sliced
    • 1 heaped tbs ginger garlic paste
    • 1/2 tsp turmeric
    • 1/2 tsp red chilli powder
    • 4 medium sized tomatoes
    • 1/2 cup yogurt
    • 6-8 green chillies
    • Salt as per taste
    • 3 cups grated beetroot
    • 1 cup chopped cilantro
    • A few fresh mint leaves
    • A pinch of saffron Irani or Spanish saffron
    • A pinch of orange food colouring
    Get Instant Help
    InstacartGet Recipe Ingredients

    Instructions
     

    • Peel, wash and grate the beetroot. Peel and slice the onions, remove the stem from the green chillies.
    • Fry the onions in oil till golden brown on medium heat after adding the whole garam masala spices(cloves, green cardamom and cinnamon, shahi zeera and bay leaf. (Shahi zeera and bay leaf are optional).
    • When the onions turn golden brown, add the ginger garlic paste followed by turmeric and kashmiri chilli powder (I prefer kashmiri chilli for its deep red colour and good flavour) Stir for a few seconds, then immediately add the diced tomatoes. Once they soften a bit toss in the yogurt, green chillies and salt
    • Now throw in the grated beetroot. Turn over and mix well in the masala. Add mint leaves and chopped cilantro.  Let it cook for sometime on simmer.
    • Meanwhile boil the basmati rice in another pot filled with water. Add 1 1/2 heaped tablespoons of salt to the boiling rice. When you taste the water after adding salt it should taste like sea water, so adjust the salt accordingly. Cook the rice till it is half done. The outer layer of the grains should have softened a little and when you press it in between your index finger and thumb it should leave at least 2 or 3 round uncooked grains. It is now time to drain the rice using a strainer or a perforated colander.
    • Pour the steaming hot rice over the beetroot masala. Take a a tablespoon of the boiled rice, add some food colouring to it, mix well and sprinkle the coloured rice on top. Also throw in a few mint leaves and chopped coriander. Then let it steam in a preheated oven at 350 degrees fahrenheit. Remove from oven after 15 mins. Turn over the biryani rice gently from the bottom to the top with a round spatula to mix well. Serve hot with onion raita.
    • Enjoy the Beetroot Biryani with roasted chicken, meat, shrimp or any of your favourite side dishes.
    Print Recipe Pin Recipe Share on Twitter Share on Facebook

    Filed Under: Rice, Vegetarian

    Creamy coco chilly pepper trout

    January 18, 2011 by Fouzia Husainy Leave a Comment


    Ingredients:
    Rainbow trout filets cut into 8 -10 pieces
    Cumin powder – 1/2 tspnAdd Image
    Red chilly powder – 1 heaped tspn
    Black pepper ground – 1/2 tspn
    Coconut powder – 4 tblspns
    Olive oil – 2 tblspns
    Fresh cilantro chopped
    Salt to taste

    Method: Clean, rinse and dry the trout pieces between paper towels, rub them with salt, red chilly powder, cumin powder, ground pepper, lemon juice & chopped cilantro and let them marinate for 10 – 15 minutes. Put 4 tblspns of coconut powder in a small dry plate. Take the trout pieces one at a time, dab them in the coconut powder and shallow fry all of them in a non stick pan on medium heat till they are just done. Take care not to over cook them by turning over after 3 minutes and cooking each side only once. They should be golden on the outside and juicy on the inside. They are just delicious! Enjoy with rice and curry.


    Food & Drink


    hotell London

    Filed Under: Fusion cooking, Non-Vegetarian, Sea Food

    My Spicy Green Chilli Chicken

    January 13, 2011 by Fouzia Husainy Leave a Comment


    Ingredients:
    2  Chicken breasts (1kg)

    2 tsp Ginger garlic paste
     1/4 tsp Turmeric powder
    1/2 tsp Cumin powder
    1 Egg
    2 + 1 tbs Corn flour

    For the chutney:
    Green chillies – 4-5
    1 cup Fresh chopped cilantro
    1/2 cupFresh chopped curly parsley
    1/2 inch piece Ginger
    1 Onion (small)
    1 Tomato (medium)
     2 tbs Vinegar
    Salt to taste
    Vegetable oil for deep frying

    Method:
    1. Clean, wash, dry and cut the chicken breasts into small bite size pieces. Rub with salt, black pepper, ginger garlic paste, cumin and turmeric powder and keep aside for 1/2 an hr.

    2. Add 2 tbs corn flour to the marinated chicken pieces and mix well. Break the egg into the chicken and mix gently so that all the chicken pieces are well coated.

    3. Deep fry them lightly in medium to hot oil till they just turn opaque. Remove from pan, drain and keep aside.

    4. Blend together all the ingredients of the chutney. Add salt. The chutney is now ready.

    5. Take another pan add 3-4 tbs of oil and set it on medium heat. Add the chutney to the oil and cook till the colour darkens a bit and begins to thicken. Now adjust the seasoning after adding vinegar and salt. Take 1/4 cup of water, blend in 1 tbs cornflour and add to the chicken as it is cooking. Mix well. The corn flour paste gives the sauce a glazed look. Let it simmer on low heat for 2 to 3 minutes.Serve hot with fried rice or noodles and enjoy.

    As a variation you can add garlic (2 cloves) instead of ginger in the chutney. You get the zing thing with the ginger while the garlic tones it down a bit. 


    Food & Drink


    hotell London

    Filed Under: Chicken, Non-Vegetarian

    Creamy coco lemon pepper fish

    January 13, 2011 by Fouzia Husainy Leave a Comment

    Ingredients:

    Basa fish filets – 4
    Fresh curly parsely chopped- 1/2 tbspn
    Lemon pepper powder – 2 tspns
    Coconut powder – 4 tblspns
    Ground cumin – 1/2 tspn
    Olive oil – 2 tblspns
    Salt to taste

    Method: Clean, rinse and cut each Basa fish filet into 2 or 3 pieces. Rub them with salt & cumin & keep them aside. After 10 minutes sprinkle lemon pepper, throw in chopped parsely & dust with coconut powder so that it coats evenly and thoroughly. Then shallow fry them in olive oil in a non stick pan and serve them hot with steamed or fried rice.


    Food & Drink


    hotell London

    Filed Under: Fusion cooking, Non-Vegetarian, Sea Food

    Tandoori Naan

    January 2, 2011 by Fouzia Husainy Leave a Comment


    Ingredients:
    4 cups white flour
    1 egg
    1/2 cup plain sour yoghurt
    1 tbs vegetable oil
    1 tbsp butter
    1 tsp active dried yeast
    1/2 tsp baking powder
    3/4 cup lukewarm water
    1 tsp sugar
    Salt to taste


    Instructions:
    Add 1/2 a tsp salt & baking powder to the flour in a food processor and blend to mix well. Add egg, yoghurt, yeast (dissolved in 1/2 cup warm water) and pulse 3 to 4 times till the dough is formed. Add a little more water and process well till you get a sticky, gooey dough for the Naan. Make 8 balls out of the dough and put them on a greased cookie sheet 2 inches apart. Cover with a damp cloth and leave for 4hrs till they are double in size. Set the oven to broil at 450 degrees F. Take one ball, dust it with a little flour, then flip flap in between the palms of your hands till it gets the shape of a naan. Put it on the griddle or a frying pan to toast on one side. You can give it a good shape by pressing it on the uneven sides after you put it on the griddle. Once you see the bubbles on the top remove and put it on broil in the oven so that the bubbly non-toasted side is under the broil. Wait for it to puff up -2-3 mins. As soon as it turns golden brown remove from the oven, brush it with butter or olive oil. The Naan is now ready. Enjoy it with a delicious curry of your choice.

    Filed Under: Party food, Vegetarian

    • « Go to Previous Page
    • Page 1
    • Interim pages omitted …
    • Page 15
    • Page 16
    • Page 17
    • Page 18
    • Go to Next Page »

    Footer

    ↑ back to top

    About

    • Privacy Policy
    • Disclaimer

    Newsletter

    • Sign Up! for emails and updates

    Contact

    • Contact me

    COPYRIGHT © 2021 MAMA'S SECRET RECIPES